Disclosure: This post contains affiliate links. If you click a link and make a purchase, we may earn a commission at no extra cost to you. We only recommend products we trust.
Building a wilderness survival kit isn’t about cramming every gadget you can find into a backpack—it’s about strategic selection of gear that works together to keep you alive when conditions turn hostile. A properly assembled survival kit becomes your lifeline when you’re facing unexpected overnight stays in the backcountry, sudden weather changes, or navigation failures that leave you miles from your intended destination. The difference between a collection of random items and a functional survival system lies in understanding how each piece of gear addresses the core survival priorities: shelter, water, fire, signaling, and first aid.
Why Proper Survival Kit Assembly Matters More Than Ever
Recent search and rescue data reveals a concerning trend: over sixty percent of wilderness emergencies involve individuals who either carried no survival gear or brought inadequate equipment for the conditions they encountered. The gap between recreational outdoor participation and proper preparedness has widened significantly as more people venture into remote areas without understanding the risks. What makes this particularly troubling is that many of these incidents occur within just a few miles of trailheads, where a basic survival kit would have prevented serious outcomes. The stakes aren’t theoretical—hypothermia can set in within hours in wet conditions, dehydration impairs decision-making within a single day, and a simple twisted ankle becomes life-threatening when you can’t signal for help or protect yourself from the elements.
The modern outdoor landscape presents unique challenges that make survival kit assembly more critical than ever before. Cell phone coverage remains unreliable in most wilderness areas, creating a false sense of security that leads people to skip essential gear. Weather patterns have become less predictable, with sudden temperature drops and unexpected storms catching even experienced hikers off guard. Trail traffic has increased dramatically, but this paradoxically means more people venture into less-traveled areas seeking solitude, putting themselves at greater risk with fewer potential rescuers nearby. Your survival kit isn’t just insurance against worst-case scenarios—it’s the foundation of responsible wilderness travel that allows you to handle problems before they escalate into emergencies.
The financial and emotional costs of inadequate preparation extend far beyond the individual. Search and rescue operations typically cost between five thousand and fifteen thousand dollars per incident, with complex recoveries reaching six figures. Families endure days of uncertainty waiting for news, and rescue personnel put themselves at risk responding to preventable situations. Beyond these immediate impacts, each rescue operation strains limited resources that could be deployed elsewhere. When you assemble a proper survival kit, you’re not just protecting yourself—you’re demonstrating respect for the wilderness, consideration for rescue personnel, and responsibility toward the outdoor community. The small investment in time and money to build a comprehensive kit pays dividends in confidence, capability, and peace of mind every time you venture beyond the trailhead.
Understanding the Core Components of Survival Kit Architecture
Every effective wilderness survival kit is built around the Rule of Threes, which dictates your actual survival priorities based on how quickly each factor can kill you. You can survive three minutes without air, three hours without shelter in harsh conditions, three days without water, and three weeks without food. This hierarchy should directly inform your kit assembly, with the most weight and attention going to items that address the most immediate threats. Shelter and fire-making capabilities deserve premium space because they work together to prevent hypothermia, your most likely killer in wilderness emergencies. Water purification comes next, followed by signaling devices that help rescuers find you before you exhaust your resources. Food, despite its psychological importance, ranks lowest because your body can function for extended periods on stored energy reserves.
The concept of gear redundancy versus weight efficiency creates the central tension in survival kit assembly. Redundancy means carrying backup methods for critical functions—multiple fire-starting tools, two water purification methods, redundant signaling devices. This approach ensures that if one item fails, gets lost, or becomes unusable due to wet conditions, you still have alternatives. However, redundancy adds weight, and excessive pack weight creates its own risks by increasing fatigue, slowing your pace, and making you more prone to injuries. The solution lies in selecting multi-functional items that provide redundancy without duplication. A metal water bottle serves as both a container and a vessel for boiling water. A large bandana functions as a water filter, signaling device, sling, and sun protection. Paracord like the PSKOOK Survival Paracord contains fishing line, fire tinder, and thread within its structure, giving you multiple survival tools in a single lightweight package.
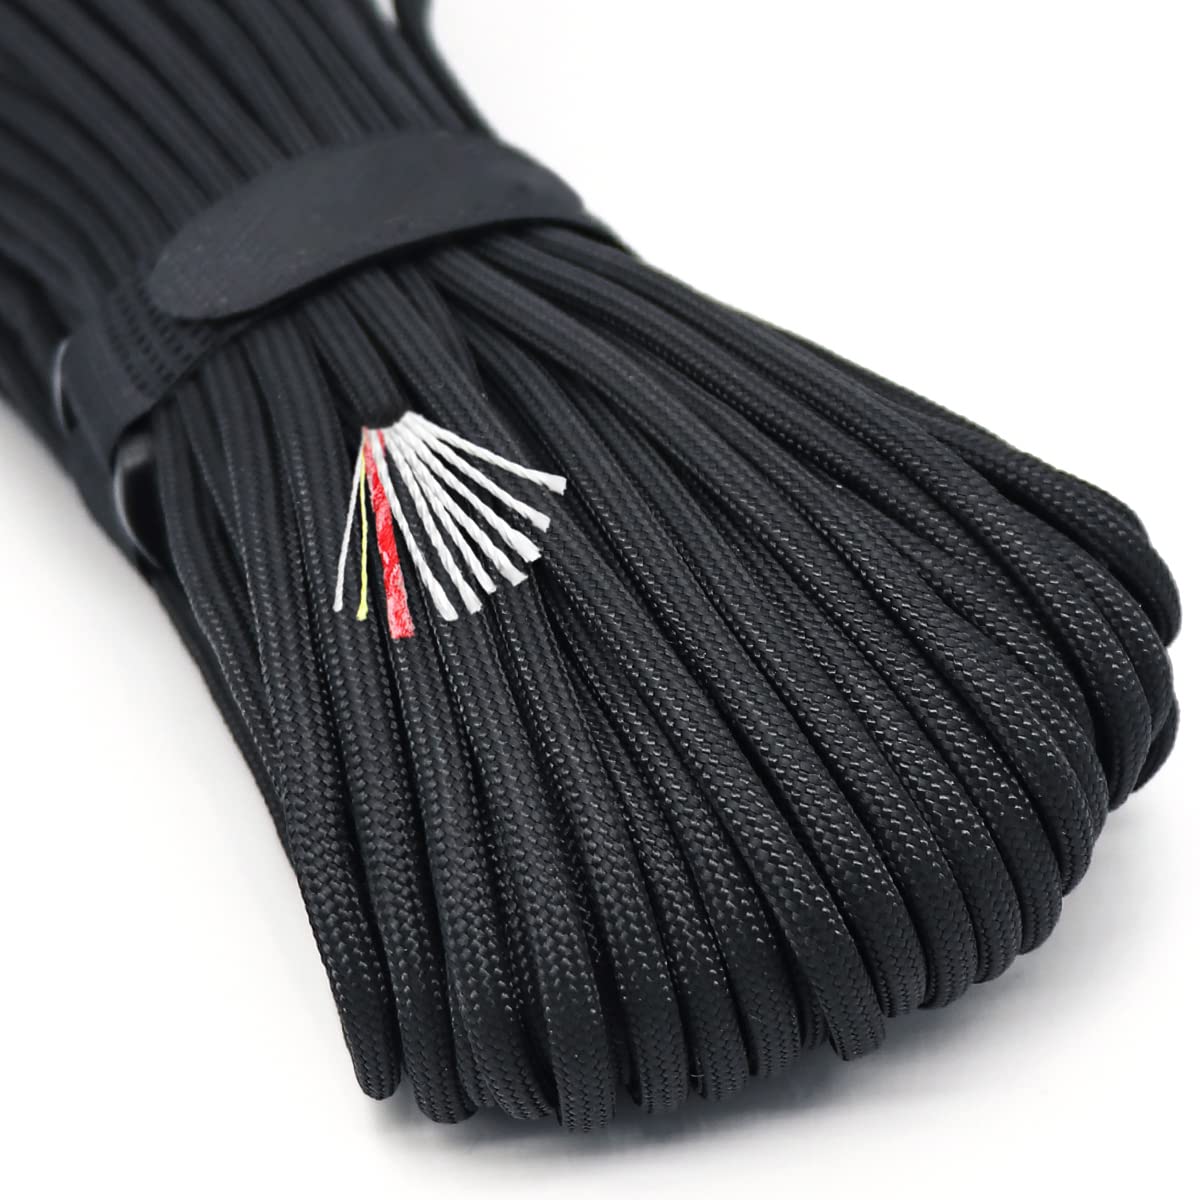
PSKOOK Survival Paracord Parachute Fire Cord Survival Ropes Red Tinder Cord PE Fishing Line Cotton Thread 7 Strands Outdoor 20, 25, 100 Feet Black-100ft 100 Feet
Paracord is not for Climbing • Revolutionary new fire paracord with survival cords: 1 PE braided fishing line(40lb), 1 red waterproof flax fire tinder and 1 cotton thread, measuring 5/32 inch in diameter. The Life-saving strands can catch fish or food, make instant fire, sew the clothes or wound, set traps • Not Stiff, Flexible as normal paracord, because our survival cords are soft strands. This is very good for DIY projects. You can make any paracord stuff by our new survival paracord, new fire starter bracelet, etc. It will be totally a new fire starter kit for any emergency needs
Organization strategy separates functional survival kits from jumbled collections of gear. The layering system divides your kit into three categories: items you need immediate access to, gear for establishing camp, and backup supplies for extended situations. Immediate-access items—fire starter, knife, emergency shelter, whistle—should ride in outer pockets or the top compartment of your pack where you can reach them even in deteriorating conditions with cold hands. Camp establishment gear includes your tarp or emergency bivy, cordage, water purification, and first aid supplies. These items can sit deeper in your pack since you’ll access them when you’ve made the decision to stop and set up. Backup supplies and extended-stay items form the bottom layer, including extra food, clothing, and redundant tools you hope never to need.
Container selection impacts both the durability and accessibility of your survival kit. Hard-shell containers like waterproof boxes protect delicate items like matches and electronics but add weight and bulk. Soft pouches and stuff sacks save weight and conform to available space but offer less protection from impacts and moisture. The hybrid approach works best for most wilderness travelers: use a small hard-shell container for your most critical fire-starting materials and first aid supplies that must stay dry, then organize everything else in color-coded stuff sacks that let you quickly identify contents. Clear dry bags work exceptionally well because they allow visual inventory without opening, and they provide waterproofing without the weight penalty of hard cases. Whatever system you choose, practice accessing your gear in low-light conditions and with gloves on—emergencies rarely wait for ideal circumstances.
Strategic Gear Selection and Assembly Techniques
Fire-making capability deserves the most careful attention in your survival kit because it addresses multiple survival needs simultaneously. Fire provides warmth, purifies water, signals rescuers, boosts morale, and allows you to dry wet clothing before hypothermia sets in. Your fire kit should include three distinct methods that work under different conditions. A ferrocerium rod like the bayite 4 Inch Survival Ferrocerium Fire Starter serves as your primary tool because it works when wet, never runs out of fuel, and produces thousands of strikes over its lifetime. The six striking edges on quality strikers let you generate sparks regardless of hand position or angle, critical when your dexterity is compromised by cold or injury. Pair this with waterproof matches in a sealed container as your backup method—they provide instant flame without the skill requirement of a ferro rod. Your tertiary fire method should be a butane lighter, sealed in a small ziplock bag to prevent accidental discharge and moisture damage.
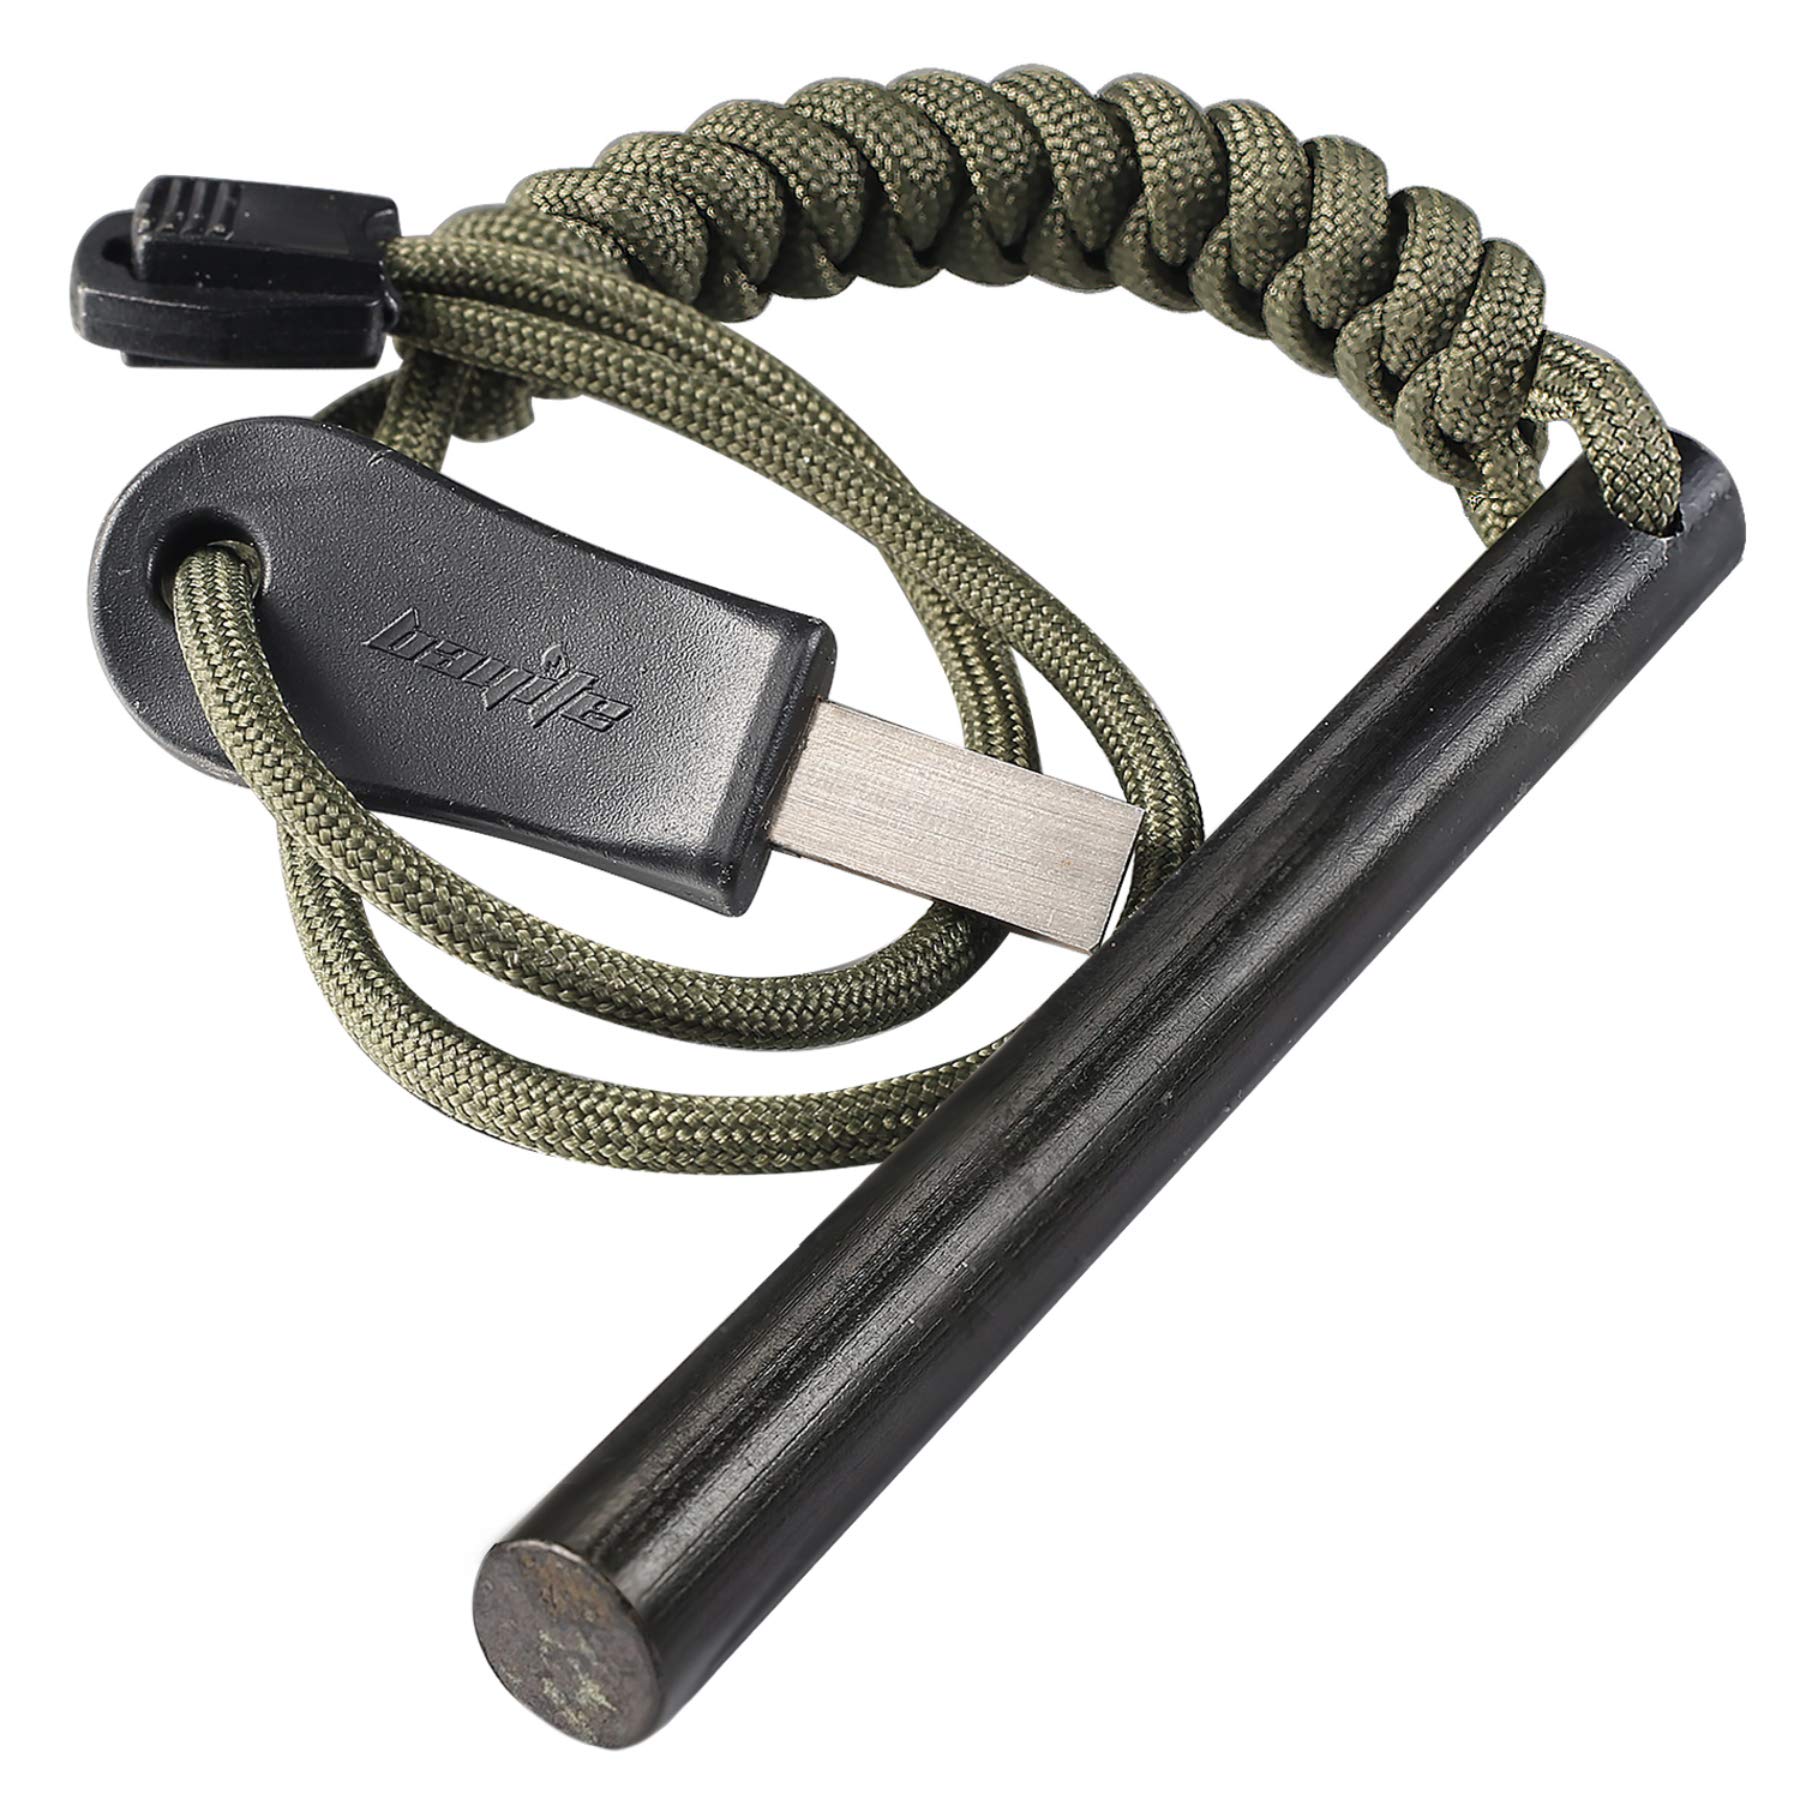
4 Inch Survival Ferrocerium Drilled Flint Fire Starter, Ferro Rod Kit with Paracord Landyard Handle and Striker, 4″(Long) x 3/8″(Diameter)
5ft Paracord included, gives you a good grip and never comes off. Comes with a bayite Striker-Pro striker attached to the paracord, always be prepared to start a fire • bayite 6 Striking Edges Striker-Pro striker is made from TOOL GRADE HSS STEEL and has a distinct hardness, maximizes a shower of hot sparks, no matter whether you prefer to use your left hand or right hand to scrape. Don’t use bad quality Knife as striker. Otherwise it will not produce enough sparks due to insufficient hardness of blade • Ferrocerium Rod Length:4″(10cm). Diameter: 3/8″(10mm). Large enough for a shower of sparks and small enough to carry
Cutting tools represent your most versatile survival equipment, but the wrong knife becomes a liability rather than an asset. Fixed-blade knives outperform folders in survival situations because they’re stronger, easier to use with cold hands, and have no moving parts to fail. The Morakniv Companion exemplifies ideal survival knife design with its four-inch blade that’s long enough for processing firewood but short enough for detailed work like carving notches or preparing tinder. The Sandvik stainless steel resists rust in wet conditions while maintaining a sharp edge through extended use. More importantly, the high-friction grip remains secure even when wet or bloody, and the finger guard prevents your hand from sliding onto the blade during forceful cutting. Keep your knife sharp using a small diamond sharpener in your kit—a dull knife requires more force and causes more accidents than a properly maintained edge.

Morakniv Companion Fixed Blade Outdoor Knife with Stainless Steel Blade, 4.1-Inch, Military Green Military Green knife
BUSHCRAFT KNIFE: The perfect all-in-one knife for outdoor enthusiasts, this outdoor knife makes an ideal camping knife, backpacking knife, fishing knife, hiking knife, or survival knife • PREMIUM BLADE: 0.08-inch thick hardened Sandvik 12C27 stainless steel knife blade stays sharp longer than carbon steel and is less prone to rust; Ideal for carving, food prep, and cutting tinder • HIGH-FRICTION HANDLE: Made with an ergonomic polymer handle with a soft friction grip and finger guard, this knife is safe and efficient for use in all weather conditions
Water procurement and purification systems must address both quantity and quality concerns. Carrying water adds significant weight—eight pounds per gallon—so your kit should focus on purification methods rather than large water reserves. A metal water bottle serves double duty by allowing you to boil water for purification while also storing it for transport. Chemical purification tablets provide lightweight backup that works without fire or equipment, though they require waiting periods and leave a slight taste. Water filtration straws offer convenience but can freeze in cold weather and clog with sediment. The most robust approach combines a metal container for boiling with chemical tablets as backup, plus knowledge of how to construct improvised filters using bandanas, sand, and charcoal to remove sediment before purification. Always carry at least one liter of water as a buffer—you need immediate hydration to maintain decision-making capability while you locate and purify additional sources.
Shelter and insulation materials protect you from the elements while weighing remarkably little if chosen correctly. An emergency bivy or space blanket weighs just ounces but reflects body heat and blocks wind, preventing the convective heat loss that leads to hypothermia. However, these items work best as components of a shelter system rather than standalone solutions. Combine your emergency blanket with a lightweight tarp and fifty feet of paracord to create a proper shelter that keeps you dry and protected from wind. The tarp provides the waterproof roof, the paracord allows you to tension it properly and secure it to trees or rocks, and the emergency blanket lines the interior to reflect heat back toward your body. This three-part system weighs less than two pounds but provides genuine protection in severe weather. Practice setting up your shelter system before you need it—fumbling with unfamiliar gear in the dark while rain soaks through your clothing is not the time to learn proper tarp configurations.
Critical Mistakes and Risk Mitigation in Kit Assembly
The single most common survival kit failure is carrying gear you’ve never tested under realistic conditions. A ferro rod that works perfectly on your kitchen counter may prove impossible to use with cold, wet hands in actual emergency conditions. That emergency bivy you bought online might tear the first time you try to enter it, or the tarp you packed might lack the necessary grommets for proper setup. Testing reveals these failures in safe conditions where they’re inconvenient rather than life-threatening. Dedicate a weekend to practicing with every item in your survival kit—start fires in wet conditions, set up your shelter in wind, purify water from questionable sources, and use your signaling devices. This practice serves two purposes: it exposes equipment failures while you can still replace items, and it builds the muscle memory and confidence you’ll need when stress and exhaustion impair your thinking during actual emergencies.
Weight obsession leads many people to eliminate critical redundancy in pursuit of ultralight pack weights. The mentality of shaving ounces makes sense for thru-hikers covering thousands of miles, but it becomes dangerous when applied to survival kits. Carrying a single fire-starting method saves two ounces but creates a single point of failure that could cost your life. Skipping the backup water purification tablets saves another ounce but leaves you vulnerable if your primary method breaks or gets lost. The appropriate approach balances weight consciousness with risk management by identifying which items truly need redundancy. Fire-starting, water purification, and signaling deserve backup methods. Shelter and cutting tools can typically be singular items if you choose quality gear and maintain it properly. Food and comfort items offer the best opportunities for weight reduction because they’re not survival-critical in short-term emergencies.
Seasonal adaptation represents another frequent oversight in survival kit assembly. The kit that works perfectly for summer hiking becomes inadequate when temperatures drop below freezing. Water purification tablets work slower in cold water, requiring longer wait times before drinking. Butane lighters fail in extreme cold, making your ferro rod more critical. Hypothermia risk increases dramatically, demanding better insulation and more robust shelter materials. Conversely, summer conditions bring different challenges: increased water needs due to perspiration, sun protection requirements, and insect management. Your survival kit should adapt to seasonal conditions through a core set of year-round essentials supplemented by season-specific additions. Winter additions include chemical hand warmers, extra insulation layers, and materials for building snow shelters. Summer supplements include sun protection, insect repellent, and additional water purification capacity. Review and adjust your kit before each trip based on expected conditions rather than carrying a one-size-fits-all setup that’s either inadequate or unnecessarily heavy.
Building Your Survival Kit: A Phased Implementation Plan
Begin your survival kit assembly by addressing the immediate survival priorities that pose the greatest risk in your typical outdoor environments. For most wilderness travelers, this means starting with fire and shelter capabilities. Invest in a quality ferro rod, waterproof matches, and a reliable lighter as your fire-making foundation. Add an emergency bivy or space blanket plus a lightweight tarp to create your shelter system. Include fifty feet of paracord for shelter construction and general utility. This initial phase costs between fifty and one hundred dollars but addresses the two factors most likely to kill you in the first twenty-four hours of an emergency. You can assemble this core kit in a single afternoon and immediately start practicing with the components. These items work together to prevent hypothermia, your primary threat in most wilderness emergencies regardless of season or location.
Phase two expands your capabilities to address water procurement, signaling, and basic first aid over the following month. Add a metal water bottle that allows boiling for purification, plus chemical purification tablets as backup. Include a quality fixed-blade knife that handles both fine work and heavy cutting tasks. Add signaling devices including a whistle, signal mirror, and bright-colored bandana. Build a basic first aid kit focused on treating the injuries most common in wilderness settings: blisters, cuts, sprains, and burns. This phase adds another seventy-five to one hundred fifty dollars to your investment but creates a genuinely functional survival kit that addresses all core priorities. Take time during this phase to practice with each new item—learn to use your signal mirror effectively, practice knife skills safely, and familiarize yourself with first aid procedures. The goal isn’t just to own the gear but to develop competence in using it under stress.
The final phase refines your kit based on personal experience and specific environments where you spend time. This ongoing process involves replacing items that didn’t perform well, adding redundancy for critical functions, and customizing your kit for the conditions you actually encounter. If you frequently hike in areas with limited natural shelter materials, upgrade to a more robust tarp or add a lightweight emergency tent. If you travel in regions with questionable water sources, invest in a quality water filter to supplement your boiling and chemical purification methods. Add navigation tools like a compass and paper maps if you venture into areas where GPS devices prove unreliable. This refinement phase never truly ends—your survival kit should evolve as your skills develop and your understanding of your needs deepens. Schedule a quarterly review where you inventory your kit, replace expired items like medications and chemical purification tablets, and assess whether your current setup still matches your typical activities and risk profile.
Frequently Asked Questions
How much should a complete wilderness survival kit weigh?
A properly assembled survival kit for day hiking should weigh between two and four pounds, while overnight kits may reach six to eight pounds depending on shelter choices and food requirements. The key is balancing comprehensive capability with pack weight that doesn’t cause fatigue. Focus on multi-functional items and quality gear that serves multiple purposes rather than carrying single-use gadgets.
What’s the most important item in a survival kit?
Fire-starting capability ranks as the most critical survival kit component because it addresses multiple needs simultaneously: warmth, water purification, signaling, and morale. A quality ferrocerium rod with proper striker should be your primary fire-making tool, backed up by waterproof matches and a lighter. Without reliable fire-making ability, your survival chances decrease dramatically in most wilderness emergencies.
How often should I replace items in my survival kit?
Inspect your survival kit quarterly and replace items based on their condition and expiration dates. Chemical water purification tablets typically expire after three to five years, first aid medications need replacement based on labeled dates, and food items should be rotated annually. Mechanical items like ferro rods and knives last indefinitely with proper maintenance, but check cordage for UV damage and replace emergency blankets if packaging is compromised.
Can I build an effective survival kit on a tight budget?
Yes, you can assemble a functional survival kit for under one hundred dollars by prioritizing core items and avoiding expensive gadgets. Start with a ferro rod, emergency bivy, metal water bottle, and basic fixed-blade knife. Add waterproof matches, paracord, and a whistle. These essentials address all primary survival needs. Upgrade individual components over time as budget allows, but don’t delay building a basic kit while saving for premium gear.
Should my survival kit be different for different seasons?
Your survival kit should maintain a core set of year-round essentials while adding season-specific items. Winter requires extra insulation, chemical hand warmers, and materials for snow shelter construction. Summer demands increased water purification capacity, sun protection, and insect management. Fall and spring require flexibility to handle rapid weather changes. Review and adjust your kit before each trip based on expected conditions rather than carrying unnecessary items year-round.
How do I know if my survival kit is actually complete?
Test your survival kit’s completeness by attempting to survive a controlled overnight experience using only the gear you carry. Set up shelter, start fire, purify water, and practice signaling—all without returning to your vehicle or using items not in your kit. This realistic test reveals gaps in your equipment and skills while you’re still in a safe environment. If you can comfortably spend twenty-four hours using only your kit contents, it’s genuinely complete for emergency situations.
Assembling a wilderness survival kit is not a one-time task but an ongoing process of learning, testing, and refinement that evolves with your skills and experience. The difference between a collection of gear and a functional survival system lies in understanding how each component works together to address the core priorities that keep you alive when conditions deteriorate. Start with the essentials that prevent hypothermia—fire and shelter—then systematically build out your capabilities to address water, signaling, and first aid. Most importantly, practice with every item in your kit until using them becomes second nature, because the middle of an emergency is not the time to read instructions or figure out how equipment works. Your survival kit represents more than just insurance against worst-case scenarios; it’s the foundation of confident, responsible wilderness travel that allows you to handle problems before they become life-threatening emergencies.
Ready to build your complete wilderness survival kit with confidence? Explore our detailed gear reviews and step-by-step assembly guides that show you exactly which items to choose and how to use them effectively. Start with our recommended essential gear and develop the skills that transform equipment into genuine survival capability.